

Hello, dear sleepy reader!
Welcome to this short yet useful post that will propel you on your sourdough journey.
We will first cover the basics of what sourdough bread is, how it is made, and why it is preferred to bread made using commercial yeast. We will then share a recipe that you can use along with the steps to take in making your first sourdough bread.
Let’s get baking!
What is Sourdough Bread?

Bread is typically made using four ingredients: flour, water, yeast, and salt. Sourdough bread follows the same rule with one exception: the yeast used for this kind of bread is cultivated organically from your surroundings.
You cultivate the yeast by simply adding flour and water together and let them sit around for some time – typically one week to one month – and you will have made yourself a sourdough yeast (also commonly called sourdough starter). Simple, yes?
Do keep in mind that just because it is called sourdough bread does not mean that it has to taste sour. The bread’s sourness can be adjusted according to your preference via various methods such as using a stiffer or more liquid starter, the proofing time and/or temperature, and even the type of sourdough starter you use.
Why Not Just Use Packet Yeast?

There is absolutely nothing wrong with using packet yeast for bread baking. It is fast, convenient, cheap, and readily available at most grocery stores. Commercial yeast is also much more reliable and easier to manage for most people.
The one department that commercial yeast loses in is flavor. No commercial yeast can match the flavor that bread made using sourdough starter can bring. Don’t believe us? Just give it a go and see for yourself.
How Do I Get Started?

You start by simple adding an equal amount of flour to and equal amount of water by weight. Yes, you must have a scale for this. In this case, you will be creating what is called a 100% hydration starter (i.e. the weight of the water is 100% that of the flour). This is called baker’s percentage (see below for examples).
| Flour Weight | Water Weight | Hydration Ratio/Baker’s Percentage |
| 100g | 100g | 100% |
| 100g | 50g | 50% |
| 100g | 20g | 20% |
It is recommended that you use an equal amount of flour – say 10g or so – and an equal amount of water when starting out. This will give you a 100% hydration starter which you can then feed once a day for a minimum of 7 days, although it will likely take between 10 to 30 days to have a fully mature starter.
The typical advice is to discard half of the sourdough starter during this initial feeding stage, and then feed it again with the original amounts. Below is a sample chart.
| Day | Leftover from Previous Day | Flour + Water | Amount to Discard after 24 Hours |
| 1 | – | 10g + 10g | 10g |
| 2 | 10g | 10g + 10g | 15g |
| 3 | 15g | 10g + 10g | 17g |
| 4 | 18g | 10g + 10g | 19g |
| 5 | 19g | 10g + 10g | 19g |
| 6 | 19g | 10g + 10g | 19g |
| 7… | 19g | 10g + 10g | 19g |
What Types of Flour and Water Should I Use?

Beginners to sourdough should use unbleached all-purpose or bread flour, and distilled water. This will give you a better handle on how to cultivate a sourdough starter before moving on to using other types of flour for the starter (if you so choose). You can also add some pineapple juice to boost the starter’s activity (this is optional).
How Do I Know When My Sourdough Starter is Ready for Use?
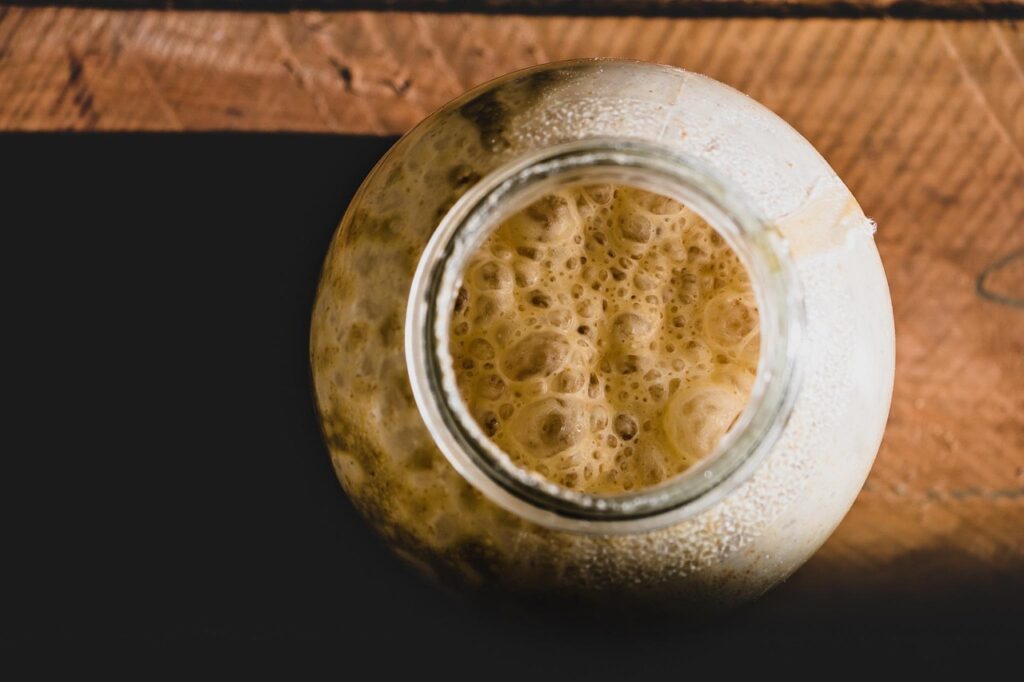
There is a popular test known as the ‘float test’ where you scoop a small teaspoon-full of the starter that you have fed four to five hours prior and dropping it into a bowl of water. The sourdough is ready for use if it floats but not ready if it sinks. We find this method of testing the readiness of the starter to be unreliable. Instead, a better method would be the doubling in size approach.
What you do is take some of your starter that you have weighed and place it inside a transparent jar. You then feed it an equal amount of flour and water to the starter’s weight. For example, for a 50g starter you will feed it with 50g of flour and 50g of water. You will then make a note of the starter’s current level either by marking the jar with an erasable marker or using a rubber band as an indicator.
Sourdough starters typically need from 4 to 5 hours to double in size although there are exceptions that fall outside this range. Your sourdough starter will be ready for use once it has doubled in size.
What Affects the Starter’s Activity?

There are a few factors that can affect the speed at which the sourdough starter will double including but not limited to how much flour and water it has been fed with, and also the temperature. The more you feed it, the longer it will take to double. Temperature-wise, the higher the temperature, the faster it will double although the yeast will start dying after reaching a certain temperature. How active your sourdough starter is also plays a role in how quickly it doubles.
Will My Sourdough Bread Turn Out as Beautifully as What I Have Seen Online?

The short answer: very likely no.
The only way to create beautiful loaves of sourdough bread is through constant practice. However, do not be discouraged because your first loaf of sourdough bread will likely still be very delicious.
Where Are the Recipes?

There are many sourdough bread recipes online and offline that you can utilize when making your first loaf of sourdough bread. Here is ours for a quick and simple start.
| Ingredient | Weight | Baker’s Percentage |
| Flour | 500g | 100% |
| Water | 350g | 70% |
| Sourdough Starter (active) | 100g | 20% |
| Salt | 7.5 to 10g | 1.5 to 2% |
Day 0
Feed your sourdough starter at least 24 hours before you intend to make the bread (assuming that you have been feeding your starter regularly in the days prior).
Day 1
Do another feeding of the starter with the 1:1:1 ratio of starter:flour:water 4 to 5 hours before you plan on making the bread. If you need 100g of starter for the bread, take 40g of the starter and feed it with 40g of flour and 40g of water. This will allow you a small buffer to compensate for any loss while also leaving you with some leftover starter that can be stored and used for the next time you make sourdough bread.
Wait a minimum of 4 to 5 hours for the starter to double in size (make sure that you have marked the starter’s level after feeding). Some starters will take less time, and some will take more, so it is best to check how the starter is doing every hour if time permits.
Once the starter is ready, you will weigh out the ingredients above and mix them all together until no flour remains. Cover the dough with a wet cloth, and knead it once every hour for the next four to five hours (this is the no-knead method of bread baking). Alternatively, you can choose to knead the dough (we recommend using the slap and fold method) until it turns into a smooth, round ball.
Place the dough into a proofing basket and cover it loosely with a sufficiently large plastic bag. Now, you can either let the dough rise for another 3 to 5 hours until it has at least doubled in size or place it inside the fridge for up to 12 hours before baking.
Baking the Bread

Place an oven-save glass or metal container (or bowl) filled with room temperature water and turn your oven’s temperature to 480f (250c) for 20 to 30 minutes. The purpose of having the water in the container is so that steam will circulate inside your oven which in turn prevents the crust from forming too early.
Meanwhile, score your sourdough bread using a lame/razor blade/shape knife. Be sure to make a sufficiently deep cut as this will allow room for the bread to expand once inside the oven.
After the oven has been properly heated, place the bread inside (checking to make sure that there is still water inside the container) and close the oven door. Lower the oven’s temperature to 450f (230c) and set the timer for 20 minutes.
Once 20 minutes have passed, remove the container with the water and bake for another 20 to 30 minutes or more (depending on how dark you like your bread’s crust).
Take the bread out from the oven and let it cool for at least one hour before slicing.
And that’s it!
May you discover the joy of sourdough bread baking (and eating) for years to come.
Note: it is often recommended to bake sourdough bread inside a dutch oven. This, in our opinion, is great but not necessary especially if you find yourself on a tight budget.


